Mrs. Wheelbarrow's Kitchen has moved to a hosted WordPress blog!

You should be automatically redirected in 5 seconds.

If not, please visit http://www.mrswheelbarrow.com and remember to update your bookmarks
and sign up for her brand new RSS feed.

Saturday, February 27, 2010

A Daring Attempt to Make Tiramisu!

a perfect slice of tiramisu

homemade ladyfingers!

Another month and another Daring Baker’s Challenge.

You might remember last month’s challenge, when I made gluten free graham crackers and nainamo bars.

This month was more in my wheelhouse. Tiramisu. From scratch. Oh, I’ve made tiramisu a few times. Traditional with espresso and mascarpone. Not so traditional with strawberries and cointreau. But I’ve always purchased the ladyfingers and the mascarpone. This time, these clever bloggers were challenging me to make my own.

l to r: mascarpone, zabayon w/walnut wine, whipped cream, pastry cream, espresso, ladyfingers

And all this happened during the Week of Eating In, so cooking anyway, and could just divvy up the time for all the different steps involved in tiramisu over the course of a few days. During the week, we were hosting a party for 12, so I thought the heavens had aligned. I wouldn’t have to eat an entire tiramisu by myself. (Dennis likes tiramisu, but doesn’t LOVE it, and has far more self-control than I do.)

I recommend this dessert for those of you who are adventurous. It’s not hard, it’s just a matter of planning. A little time (about an hour) each day for three days.

The February 2010 Daring Bakers’ challenge was hosted by Aparna of My Diverse Kitchen and Deeba of Passionate About Baking. They chose Tiramisu as the challenge for the month. Their challenge recipe is based on recipes from The Washington Post, Cordon Bleu at Home and Baking Obsession.

Here's the way I planned my approach.

Tuesday: Mascarpone Cheese – Baking Obsession for Homemade Mascarpone Cheese

Wednesday: Savoiardi/ Ladyfinger Biscuits – Recipe from Cordon Bleu At Home,
And pastry cream and zabayon from the tiramisu recipe
Thursday: Tiramisu – Carminantonio's Tiramisu from The Washington Post

Friday: serve
(not as pretty as I had hoped, but.... tastes amazing)

I made the mascarpone with the freshest most delicious cream,and the pastry cream and zabayon with beautiful farm fresh eggs
and milk that had just arrived at the market, in the classic glass bottle.
I substituted my homemade walnut wine for the Marsala, adding a spicy Christmas-y kind of undertone to the zabayon.
I brewed decaf espresso. No kidding. I gave up caffiene 10 years ago, and one piece of tiramisu could make me climb the walls if it was fully-caffienated.
I loved making the ladyfingers. Simple and satisfying. Felt like a good skill to have. They’re made from the most basic baking ingredients with no more than a sieve, a bowl, a big rubber spatula for folding, and an electric mixer. While the recipe suggested ladyfingers 5" long and 3/4" wide, I found a 3" x 1" ladyfinger was prettier and more useful.

I substituted homemade blood orange liqueur whenever the recipes called for vanilla extract.

And I warmed 1/3 c homemade raspberry jam into which I stirred 3 Tbls. orange liqueur, cooled, then poured over the bottom layer of ladyfingers, making this tiramisu a distant cousin to the trifle I made over Christmas.

I formed the tiramisu using a 10" springform (no bottom pan) right on the platter on which I wanted to serve. I selected perfect small ladyfingers to make the outside layer.

I gave the finished tiramisu a full 24 hours to soak, macerate and develop.

So worth it. So worth it.
At the very least, make the mascarpone. It’s ridiculously easy, and you can stir the leftover into your grits the next day. Or stuff dates. Or do anything you would do with creme fraiche. Use very fresh cream.

By the way, the party was cancelled as there were storms, high winds, and the fear of more snow. I’m so sorry to have missed the chance to chat up the farmers and other members of the CSA, and hope we can reboot in about a month.

So, I have a huge tiramisu. It’s more than delicious, it tastes like the labor of love it is. If you are in the neighborhood, give me a call and come have a piece of tiramisu, and please please save me from eating the whole thing.

Here are some additional photos. The recipes are all linked.

the most demanding part of making mascarpone is waiting for 190• whipping egg whites for ladyfingers

sift flour over the eggwhites & yolks, folded together

gently fold until just combined
crackly topped ladyfingers

Thursday, February 25, 2010

Still Eating In - Days Three & Four

We're continuing to eat in for the week, along with so many others (check the hashtag #eatin on Twitter.) It's been lots of fun for me, I've been busy cooking all sorts of things, testing out recipes.

For day three's dinner, I made a Peruvian style roast chicken. I was inspired to get this chicken recipe written and all the ingredients measured out (I've made it before, but never bothered to measure) for the Food52 contest this week - Your Best Roast Chicken. Already, every single recipe entered looks fantastic. I like this one and this one, too.

The fact is, I just love roast chicken. But this Peruvian recipe is one of my favorite ways to enjoy a small roaster. Tasty, spicy, easy. And the leftovers are just great.

We had rice, to which I added green olives and toasted almonds. And I oven roasted some golden turnips from the CSA that were sensational.
Day four of the Eat In and our fridge is full of little bowls of this and that. I declare it's time for a leftover dinner, and supplement the daal, steak, chicken, black beans and rice with a loaf of no-knead bread and this delicious carrot soup from Food & Wine.
I also made a pot of cheesy grits specifically so I could have leftover grits to make grit cakes. That's what I have been craving for breakfast, and I made enough for the next three or four days. I bought these Hoppin John grits at the Bethesda Central Farm Market last Sunday from Anna St. John. Anna carries grits, meal and flour from Hoppin John, as well as her own homemade raviolis and soups, and Dylan's favorite snack - seriously crunchy Dog Balls.
The Eat In has been a fun way to chronicle the cooking this week. But I have to say, I've been missing my garden this week, and hope the snow will retreat soon so I can get back my balanced life - in and out, kitchen and garden.
I did sneak out through the snow this afternoon to get this picture of a few snowdrops, about to burst into bloom. Spring really is around the corner.
Peruvian Style Roast Chicken with Roasted Garlic

Buttermilk Brine
3 c buttermilk
2 crushed garlic cloves
4 T white wine vinegar
2 T Kosher salt
One 3 to 3.5# roasting chicken - from the farmers market, pastured, grass fed

Peruvian Style Rub
1 medium head garlic
1 tsp olive oil
4 T softened butter
1 T hot Hungarian paprika or smoked paprika, or a combination - depending on personal preference
1 t turmeric
1 t ground cumin
1/2 t salt
3 limes
3-4 sprigs gresh thyme
1/2 c chicken broth

Soak the chicken in the buttermilk brine for 3-4 hours. I use a ziplock bag, as it's easier to get the buttermilk all around the chicken.
Roast the head of garlic. Slice off the top of the head, exposing all the cloves. Drizzle oil between all the cloves, and wrap the whole thing up in foil. Bake for about an hour at 350. I use the toaster oven.
Squeeze all the tasty roasted garlic out into a small mixing bowl. Add the butter and spices, and the juice of one lime, and make a paste.
Remove the chicken and brine from the refrigerator. Rinse the chicken and throw away the brine. Pat the chicken dry. Rub the paste under the skin of the breast and thighs and then over the entire chicken. Tuck one or two quartered limes in the cavity and truss the chicken loosely.
Allow the chicken to come to room temperature and the paste to season the chicken - about 30 minutes.
Preheat the oven to 475 with the rack in the bottom third of the oven. In good weather, I use my outdoor gas grill as an oven. It heats up faster and hotter than the oven. Get out a heavy cast iron skillet.
Heat the skillet for 3 minutes on high heat. Add a shimmer of canola or other oil and get that good and hot, too. Another minute or two.
Slip in the chicken, back side down, into the skillet, and then place the skillet in the oven (or on the grill.)
The chicken will take about 5o min. to one hour. The only reliable test is a thermometer reading of 160.
Remove the chicken from the oven/grill and put it on the stove, over high heat. Add the thyme and 1/2 c chicken stock, then spoon the broth over the chicken. Allow the bird to rest for 10 minutes, then quarter and serve.
I pair this chicken with rice spiked with green olives and toasted almonds and a roasted vegetable or lightly dressed salad.

Tuesday, February 23, 2010

Day Two: Week of Eating In


It was a day of catching up on pantry basics here. I put up a pint plus of duxelles using gorgeous organic cremini, button and shitake mushrooms from our CSA. The recipe is Eugenia Bones' - saute diced mushrooms in olive oil with shallots until dry, add some wine or cognac and cook it off, then pack in jars, cover with olive oil, and store in the refrigerator for as long as a couple of months. I use these mushrooms for many things -- pizzas, focaccia, crostino, scrambled eggs, tucked under chicken skin, tossed with noodles, and spooned into soups.
I started another loaf of no knead bread. And I worked on some cooking projects destined for another post.

Breakfast was toast, cheese and an apple. (Dennis had his granola and berries.)
Lunch - easy! - leftovers from last night's Indian feast.
Dinner was one of our standard meals. Black bean Borrachos, from the freezer. Wrapped in a tortilla for Dennis. As a salad for me. Oven fried sweet potatoes. Salad greens with shallot, sherry vinegar, crunchy fleur de sel, cracked black pepper, and a very green, first pressing olive oil.
The magic zing-a-ling? That secret sauce pictured at the top of the page? One of my favorite cooks/twitter-friends - SavoryKitchen - sent me this bottle of her secret tasty sauce. I don't know if it's the honey from her own hives, her magical setting near one of my favorite spots in the world, Plum Island, or just the extra special niceness of an unexpected gift of homemade food, but it just made the dish. I hope to trade comestibles from our pantries again, and soon! Check out Mary's blog at Cooking 4 the Week.

Another day of Eating In. Tasty.
Black Bean Borrachos
adapted from LastNightsDinner recipe on Food52.
(I love Jen's recipe as is, but Dennis doesn't like spicy/hot and isn't so crazy for chunks of tomatoes, so I subbed tomato paste and add jalapenos to my own bowl of beans, after the cooking.)

1# black beans - I prefer Rancho Gordo's Midnight beans
1 bottle Guinness or other dark beer
2 Tbls tomato paste
1 onion, chopped rough
1 garlic clove, chopped rough

Rinse the beans in cold water, then, in a large stockpot, cover with boiling water by 2".
Add beer, tomato paste, onion and garlic.
Bring to a boil, then reduce heat and simmer 2-3 hours.
I freeze half of the beans. It's a weary cook's lifesaver to take a bag of these beans out for dinner.

Oven fried Sweet Potatoes
Serves 2 (with extra for the clean-up snacking)

3 medium sweet potatoes, skin left on, cut into thin wedges
3-4 T olive oil
2 tsp Penzey's Southwest Seasoning

Preheat oven to 375
Line a baking sheet with parchment
Toss sweet potato wedges with olive oil
Place in a single layer on the parchment.
Sprinkle with Southwest Seasoning
Bake for 20 min
Turn the wedges over
Bake for an additional 15-20 minutes

Monday, February 22, 2010

Day One: Week of Eating In


Starting the Huffington Post's Week of Eating In today, here are some decisions I made.
For the rest of the Week,
All food we eat will be cooked in my kitchen.
No restaurants.
No processed foods (naturally.)
Use what's in the refrigerator, pantry and freezer to round out the meals. After all, I spent weeks last summer "putting up" and sourcing all sorts of foods.
Document it here.

Does that mean everything? I decided YES when we were out doing errands and Dennis said "Let's stop at Starbucks." I responded, "No, let's go home and I'll make you a latte."

I may weaken as the week goes on.

Mostly, I suppose, this is an opportunity to provide a view right into the kitchen. What gets cooked, how we eat, every week day in and day out. And how I put together meals for both Dennis who is primarily vegetarian (or, our favorite new tag - a meat reducer) and my more omnivorous nature without spending all day in the kitchen.

At breakfast, our true natures come out.
Dennis: Granola, soy milk, blueberries (Trader Joes, from Chile)
Cathy: No-knead wheat bread, local cheese (CSA) - gouda

Lunch. Dennis is great about eating leftovers. I'm on a minestrone kick. It's very filling and not fattening.
Dennis: Leftover manicotti
Cathy: Homemade minestrone (from the freezer)

Snacks.
Apple (CSA) & cheese (CSA)
Kelsey's darn Bundt cake (now half gone)
Roasted tamari almonds

Dinner:
We've been travelling, and have missed having Indian tastes, a staple in this house. We both love daal, such a simple, satisfying food, easy to spice up with some of my garden-fresh minced jalapenos (from the freezer.) Add to that, cardamom scented rice, Nigella Lawson's superb sake-marinated steak, and roasted cauliflower and potato. Homemade mango chutney and thick yogurt balance the heat. A perfect dinner in.
Here are the recipes, and the photos.

Sake-marinated Steak
adapted from Feast by Nigella Lawson
Serves 2

2 small beef filet or a few pieces of tenderloin tips, total 10 oz

Marinade
1 tsp English mustard
2 Tbls Worchestershire sauce
1 T soy sauce
1 T Asian chili or garlic oil (this is quite spicy, adjust to your taste)
1/4 c sake

Canola or grapeseed oil - scant 1/2 tsp.

Mix marinade ingredients, except sake, in a bowl or small ziplock bag. Add beef and marinate for at least 3 hours and up to two days.

About an hour before cooking, take the beef out of the marinade and place on a rack, allowing the beef to dry out a bit.

Place a cast iron or other well-seasoned pan over high heat for three minutes. Add oil, heat for another two minutes.

Add beef and sear on high heat for 3 minutes per side (assuming thick cuts of beef). It should be seered and crispy. Wrap in a double thickness of foil and allow to rest 10 minutes, sitting atop a wooden cutting board or on a stack of newspapers. (This last is direct from Nigella, and such a smart idea. Maybe I'm just dense, but until I read that, it didn't really occur to me to keep the meat warm and off the cold countertop while it rested. Newspapers are very insulated.)

When ready to serve, heat the sake, boil off the alcohol and reduce by 1/2, then open up the foil, slice the beef and plate over the cardamom rice, adding the accumulated juices to the sake and then drizzle the sauce right over the top.

Cardamom Rice

1 c basmati rice
3 cardamom pods, smashed
2 c water

Bring water to a boil. Add rice and cardamom pods. Bring back to a boil, stir, cover and reduce heat to simmer. Cook for 13-15 min. then stir with a fork and keep covered until ready to eat.

Roasted Cauliflower and Potatoes from Gourmet, 2004. Delicious. Easy. Satisfying.

Yellow Lentil Daal

1 T canola oil
2 c chopped onion
2 garlic cloves, minced
3 c water
1 c yellow daal lentils
1 tsp turmeric
1 tsp ground cumin
1/2 tsp ground ginger
1/2 - 2 tsp minced jalapeno
1 Tbls cilantro, chopped

Heat oil in 4 qt saucepan or saucepot with cover. Saute 1 c onion and 1 garlic clove until golden brown. Remove from pan and set aside.

Add to the pot water, lentils, 1 c onion, 1 garlic clove, spices. Bring to a boil. Reduce heat and cover and simmer until tender, about 25 minutes. Add minced jalapeno to taste. Taste and correct for salt. Cook 10 additional minutes.

Remove 1/2 the lentils and blend in the blender (or do as I do and just blitz the whole pan a few times with the immersion blender). Stir in the browned onion and garlic. Top with chopped cilantro.

Sunday, February 21, 2010

Went on Vacation and My Attitude's Adjusted

carnival dancers

I've been away. Really away. I have thought about writing. Even started a few posts, but I just couldn't get all the ducks in a row until right now. Many things have happened. It snowed. It snowed again. I had a birthday. I made three cakes and invited the kids in the 'hood to come to my birthday party. If ever you are fighting the big bad blues on your birthday, just invite some ten year olds over. They know how to do a birthday party.


Then, my computer quit on me. Died. Bought a new one. Waited a few days to get data from old to new. Sent old one off for new logic board. Computer drama is now officially over.

Then, we went on vacation. Mexico. It was heavenly. I highly recommend Playa del Carmen and send shout outs to all who provided names of hotels, restaurants, transportation, massage, sight-seeing insights. Thank you so much for the direction - it made the trip all that much better.

I expected to do some writing while away, but a spotty wi-fi connection was all the excuse I needed to procrastinate. And the garden at the hotel.


Now, home again, spent the last two days at farmers markets and CSAs, so the refrigerator is full. The laundry is sorted and underway. Bathing suits and t shirts put away. I have no more excuses.

I signed up for the Week of Eating In challenge from The Huffington Pos and from 2/22 to 2/27 I'm going to report on what's going on in my kitchen.

Also, on Thursday, we're co-hosting a get-together for Bending Bridge Farm (our winter vegetable CSA) and the other CSA members and friends. It's a potluck, aptly titled Parsnip Appreciation Night - an opportunity to celebrate the fantastic winter vegetables Audrey and Cameron have been providing and shake off the winter blues.

Tonight, our first home-cooked meal, I went to Food52 and enjoyed the recent winning recipes from two of my favorite bloggers - Jennifer Perillo, In Jennie's Kitchen, and Kelsey, The Naptime Chef.

Jennie's Manicotti is so delicious! I had a pint of last summer's oven roasted tomato sauce in the freezer, made some fresh ricotta, the crespelles, and had a delicious dinner ready in no time at all.


And Kelsey's easy Bundt Cake made tonight's dinner seem like a special occasion. I used olive oil and baked it in my favorite fancy bundt pan.

A wonderful vacation. Nice to be back.

the amazing ruins at Tulum - I had no idea - expected a pyramid, not an entire city

the architecture is very complex, and imagining the structures with bold painted exteriors blew my mind

I hate to sound trite, but this really was one of those experiences that made me feel like a blip on the timeline of the world.


one happy camper

Friday, February 5, 2010

White, Wheat or Rye? Jim Lahey's No Knead Bread

Everyone's talking about no-knead bread. It must have been one of the most gifted holiday cookbooks, according to the abundance of blog posts about the brilliance of this bread. Let me just chime in. This is the tastiest, easiest, most dependable bread I've ever made.
Since we first met, Dennis has talked about his grandmother's bread. Grandma Barrow's bread, cut THIS thick (thumb and finger about 2" apart) spread with peanut butter and jelly. These were the sandwiches of his youth, of his dreams, and that bread just vexed me.

I've baked bread for years. Decades, in fact. My challah is really good. I learned to make raisin/cinnamon swirl bread in high school, for heaven's sake. Focaccia, flatbreads, grilled naan, pizza - all easy as can be. Try as I might, I couldn't manage to satisfy that memory of Grandma Barrow's bread.

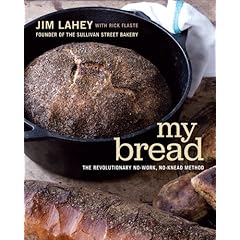
My Bread: The Revolutionary No-Work, No-Knead Method

Not until Jim Lahey came into my life, that is. Here's the story on Mr. Lahey and no knead bread, as Mark Bittman first told it in 2006.

Stir up the four basic ingredients - flour, water, yeast, salt - and let rise very slowly over 12 to 18 hours. Gently fold, let rest, and gently place in a preheated cast iron covered dutch oven.

Take note: While it's a simple bread, there is one very important, utterly vital, piece of equipment. Maybe you have a big (5 qt) cast iron covered dutch oven somewhere in your kitchen cupboards. Lahey references Lodge, Emile Henry and Le Creuset. Here's a little hint - every time I've been in Marshalls, they have had Staub, Le Creuset or look alike brands at very reasonable prices.

What emerges is a light, airy, hard-crusted rustic loaf. Absolutely fantastic. Ethereal. Crackling. And what Dennis remembers from his childhood.

first loaf - too much flour on the towel and upside down in pot - still yummy

We did many tests. Dennis jumped in and made bread with me (so fun!) We made the Basic White Bread three times, Whole Wheat Bread twice, and Rye Bread twice. And I'm here to report.

Each time we made the bread, it got better. We needed to develop skills - first, the stirring - the ingredients need to be well stirred, not casually mixed.

Also, the folding stage - flour the towel well by rubbing about three tablespoons of flour into the center of the towel in a circle about 18" in diameter. Use the heel of your hand to get the flour into the fabric. Brush away the excess. Do not add more flour, if you can help it.

Gently ease the dough out of the bowl onto the floured towel, trying to maintain the gluten strands by easing the dough away from the sides of the bowl with a rubber spatula or a bench scraper. Fold the dough gently in half, giving the dough a quarter turn, folding, turning and folding three or four times. Use a bench scraper to help you lift the dough and turn it over, seam side down. Be gentle.

Finally, when it comes time to bake the loaf, it took a couple of tries to center the dough in the middle of the hot cast iron pan, and to learn to let it flip over without panic.

f it ends up on one side of the pot, or upside down, don't stress out. It's going to be gorgeous no matter where it lands.

The beauty of this bread is the crackly crust and the big giant air holes throughout.

We loved the white bread. It was a perfect loaf for toast, sandwiches, croutons, bread crumbs.

The wheat bread was tasty. A nice brown bread with a tangy flavor.
And the rye bread was fine. Not great. I blame it on the quality of the rye flour and will be searching for better rye.

You see, now that I've fulfilled Dennis' bread dream, I will pursue mine - a good sour rye that for the life of me I can only find in New York City.

I'm not done with Mr. Lahey's book. There is so much more to learn from this technique - he has some spectacular ideas for the white loaf, including one long batard shown with oven roasted tomatoes nestled in the surface of the bread.

The white bread - seriously - is the best all around loaf I've ever made. I figured out the timing for our household - I stir the ingredients together after lunch (1:30-2pm) and let it rise overnight. Wake up, fold the loaf around breakfast time. Bake two hours later, and the bread is ready in time for lunch. Of course, I work at home, so this works for me.

For those of you who go out to an office, try this for timing.
7am Stir together the ingredients when your coffee is brewing in the morning. It's only four ingredients. You can do it.
7pm Turn the loaf out and do the folding part.
8:30Turn on the oven and slide in the covered pot.
9pm bake the loaf.
9:45 You'll have a fresh loaf that will be ready for breakfast the next day, and for sandwiches to take to work and/or school.

And my final bit of advice. It's very important to allow the bread to cool completely. Completely. While the idea of warm bread fresh from the oven is intoxicating, in reality, the bread is better if allowed to cool completely.

The Magic Recipe
Jim Lahey's No-Knead Bread
Makes one loaf

1/4 tsp dry yeast
1-1/2 c cool water
3 c bread flour (wheat: 2c bread/1c wheat flour; rye: 2-1/4c bread/3/4c rye flour)
1-1/2 tsp salt

Stir together all the ingredients until you have a shaggy, sticky dough.
Cover and set aside for 12-18 hours. The longer this rise, the more rustic and sour the bread.
Turn the dough out onto a well-floured tea towel. Lifting with a bench scraper, fold the dough over, turn one-quarter turn, and fold again. Do this three or four times, then turn the entire loaf over, seam side down, and loosely fold the towel over the dough.
Put the towel on a wooden cutting board or a stack of newspapers - not on your cold countertop - and allow the dough to rise for two hours.
Thirty minutes before the end of the second rise, with the rack in the lower third of the oven, turn the oven on to 475• and slide in your cast-iron covered dutch oven.
At the end of the rise, undo the towel and allow the dough to fall gently into the bottom of the dutch oven. Cover it and bake for 30 minutes.
Uncover the loaf and bake for 15-30 additional minutes, and the bread is deeply golden and registers an internal temperature of 200•.
My loaves are always ready after 45 minutes total baking time, but your mileage may vary.

Wednesday, January 27, 2010

How Daring Am I? Nanaimo Bars


When January 1st rolled around, I decided I would join the Daring Bakers for 2010. The monthly recipe challenges seemed like a great idea. I'd get to try new recipes. Writing about the challenges would help feed the hungry blog monster. And I love the idea of cooking essentially the same thing at the sametime as a whole bunch of other cooks all around the world, and then seeing how each cook works their own personal magic.

Well, the first challenge for Daring Bakers nearly did me in. Nanaimo Bars.

The January Daring Bakers' Challenge was hosted by Lauren of Celiac Teen. Lauren chose Gluten Free Graham wafers and Nanaimo Bars as the challenge for the month. The sources on which she based her recipe are found here.

Graham Wafers -- 101 Cookbooks -- which Lauren adapted to be gluten free.
The adapted recipe is at Nanaimo Bars - City of Nanaimo.

To be frank, there was little that appealed to me about these layered bars. The bottom layer was essentially graham cracker crumb. And I had to make the graham crackers. Gluten free, too!

Here's something I haven't shared with many people. Graham crackers give me the WORST stomach aches. So, I never ever make anything with a graham cracker. I always substitute amaretto cookies. Or ginger snaps. But that Gluten Free twist? This challenge might clear up the graham question that has plagued me since I was a child.

So, I spent some time reading about celiac disease and gluten free cooking on Lauren's excellent blog, and decided to roll up my sleeves.

Off I went to the Thai grocer for glutinous rice flour and tapioca flour. Then to the Co-op for Sorgham flour. The rest of the ingredients I had in the pantry.

I intended to make half a recipe of the graham crackers. While the instructions said the graham crackers would last for two weeks, I wasn't that into the whole idea. (Seriously bad tummy problems.)

But the danged computer still doesn't work in the kitchen, so I was running back and forth to the front of the house, where the network connection is strong, reading instructions and back to the kitchen to cook. Really, it was just comical. Needless to say, I managed to get confused and added full amounts of half the ingredients, so I remedied the situation, finished the dough, and had a full recipe.

This would turn out to be a good thing.

I chilled the dough which was VERY soft, cut out the crackers and chilled them again, then made those cute little poked holes all over the cracker so it would look like the pictures. Into the oven - 12 minutes later this is what I had.

Disaster.

I shortened the time to ten minutes for the next two trays. Not much better. I stacked them up cleverly and took a photo. Then I threw them all into the food processor and blasted it into crumbs.

I have to admit. Those crumbs smelled divine. Brown sugary. Buttery.

The next day, I finished off the challenge. The original recipe called for a custard layer made with something called custard powder. I had no idea where to find that, so I considered a very stiff creme anglaise. Of course, this was two days before the posting date... of course I should have started this weeks ago, but I've always been a procrastinator.

Then I remembered my lemon curd stash. The freezer has four containers of Meyer lemon curd from one of the times I was unable to walk away from Meyer lemons.

Now, we're talking.

My little mind started whirring. Thinking of one of my favorite holiday cookies, I mentally combined pistachio, lemon, ginger and chocolate, and put a Mrs. Wheelbarrow spin on the Nanaimo bar.

Line a 8x8 baking pan with parchment paper.

For the base layer:
1-1/2 c graham cracker crumbs
1 stick butter, melted
1/2 c sugar
1/2 c chopped roasted, salted pistachio nuts (not red)
1/2 c crystallized ginger

Stir ingredients together and press firmly into the bottom of the baking pan.
Chill for 1 hour.

For the middle layer
1 c Meyer lemon curd (here's a link to Alton Brown's curd recipe)

Spread across the top of the base layer and chill for an hour.

For the top layer
Melt together 4 oz semi sweet chocolate & 2 oz unsalted butter. Stir well and cool for a few minutes so it's not too hot when you pour it on top of the lemon curd.

Now, chill this for at least 8 hours, overnight, if possible. Lift it out by the paper edges and

Cut with a knife that you clean after every cut.

These are sweet, gingery and tart with fresh lemon - really delicious. Cutting them was a challenge. Here's the prettiest plate I could manage. I needed one more day to chill them more, and the photo would do them justice.


Thank you to the Daring Bakers for opening my eyes to gluten free ingredients and to Lauren to introducing me to this tasty Nanaimo bar. And no tummy problems at all. I'm sold.